We’ve already seen how to setup Neo4j on a public EC2 instance using the community edition AMI, but what if you want to run on Docker?
Neo4j also has a supported Docker image that can be used to run the graph database inside a container.
AWS offers support for containers through Amazon ECS (Elastic Container Service). You can use ECS to create a Cluster, within which you can run Tasks.
Amazon currently support two types of ECS Cluster:
- Fargate
- EC2 with Networking
In this guide, we’ll walk through the EC2 option, but we also have a guide for Fargate, if you prefer not to manage the EC2 servers yourself.
Note: One important caveat if you choose ECS Fargate is that you can only mount your graph data to EFS. This doesn’t give you much flexibility when it comes to performance, compared to if you used an EC2 cluster and EBS.
With EBS volumes, you can provision higher throughput and larger storage quickly and easily. You can also stop your EC2 instance when it’s not needed, and have the Neo4j graph data persist on the EBS volume until you’re ready to start your EC2 instance again.
So, let’s get started. This article assumes you’re starting from scratch, which means we’ll create the full network first (VPC, subnets, route tables, etc.).
The main guide will create Neo4j inside a private subnet, but if you need to run it in a public subnet, the steps are identical, but no need to create the private subnets or NAT Gateway.
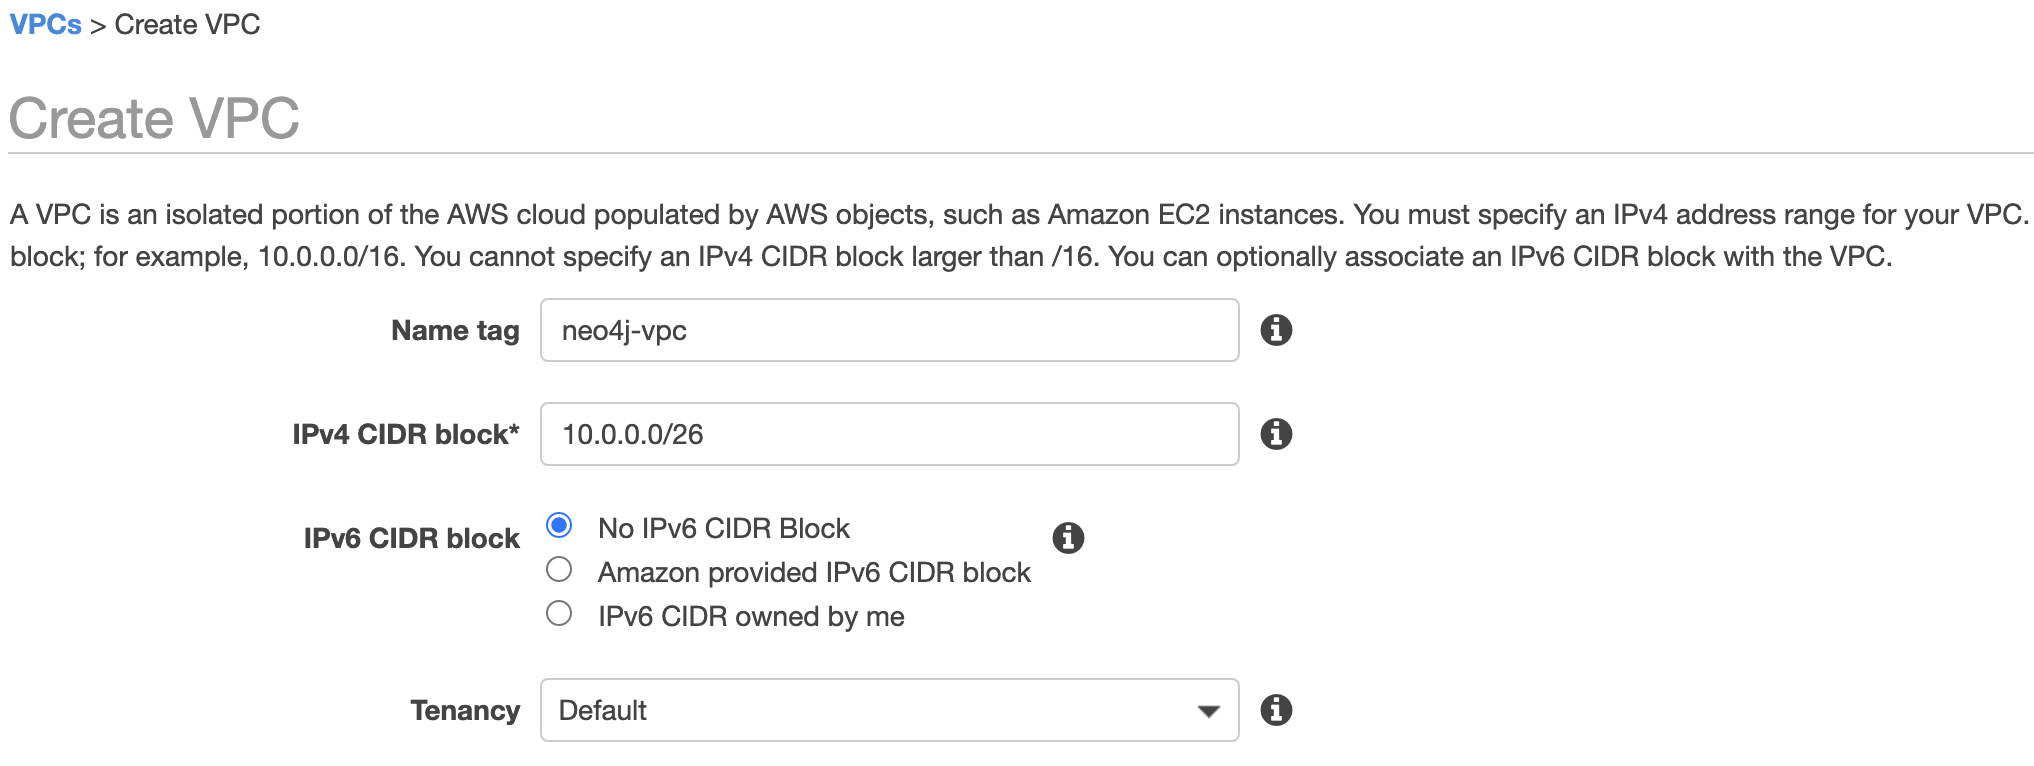
Create the VPC
The first step in creating any network is to create the VPC. This will contain the subnets, within which we’ll be launching the EC2 instance that runs our Neo4j Docker container.
- Open the Amazon VPC console
- In the VPC Dashboard, select Your VPCs, then Create VPC
- Provide a Name tag. In our example, we’ll use neo4j-vpc
- For the IPv4 CIDR block, enter: 10.0.0.0/26
- Click Create
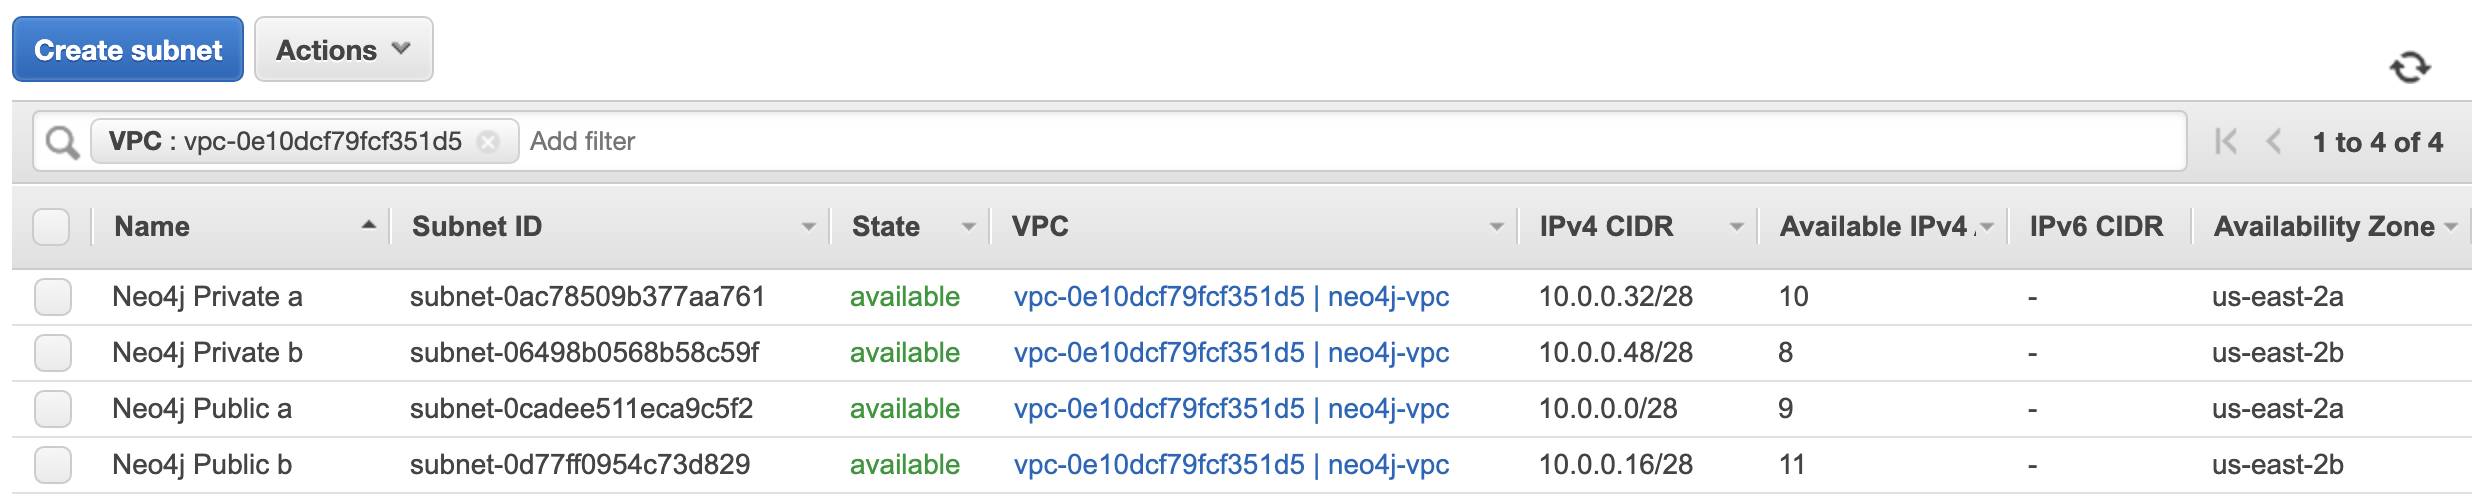
Create the Subnets
The second step in our network creation is the subnets. Because we want to run our Docker container in a private subnet, but with internet access, we’ll create both private and public subnets.
- Return to the Amazon VPC console
- In the VPC Dashboard, select Subnets, then Create subnet
- Create 4 subnets, using the following values:
| Name tag | VPC | Availability Zone | IPv4 CIDR block |
|---|---|---|---|
| Neo4j Private a | neo4j-vpc | us-east-2a | 10.0.0.32/28 |
| Neo4j Private b | neo4j-vpc | us-east-2b | 10.0.0.48/28 |
| Neo4j Public a | neo4j-vpc | us-east-2a | 10.0.0.0/28 |
| Neo4j Public b | neo4j-vpc | us-east-2b | 10.0.0.16/28 |
Because we created our VPC in the us-east-2 (Ohio) AWS region, the availability zones are also us-east-2. If you’re creating your resources in a different AWS region, please adjust your AZ choice accordingly.
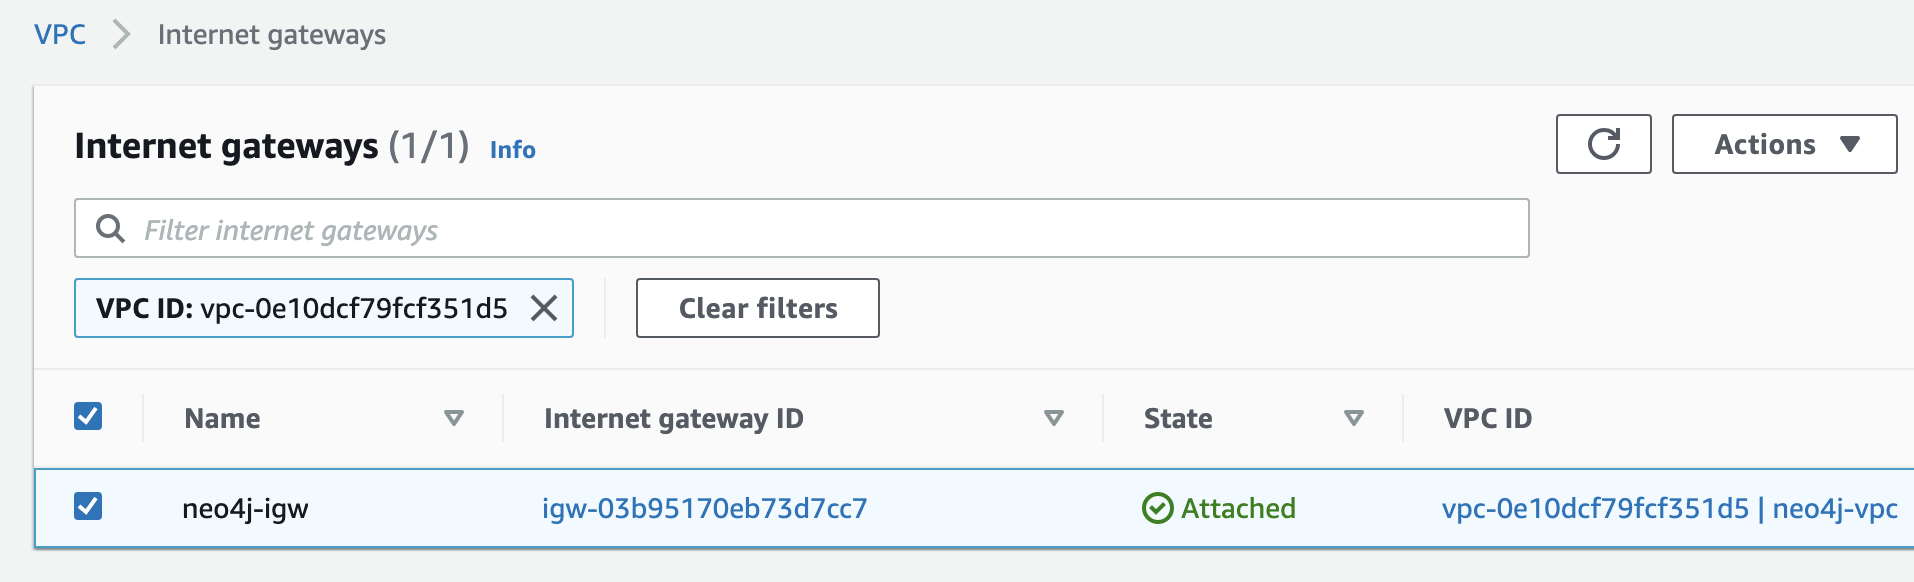
Create the Internet Gateway (IGW)
Even though we’ll be running our Neo4j container in a private EC2 instance, we’ll still need internet access. The first step to achieve this will be creating an internet gateway and attaching it to our VPC.
- Return to the Amazon VPC console
- In the VPC Dashboard, select Internet Gateways, then Create internet gateway
- In the Name tag field, enter: neo4j-igw
- Click Create internet gateway
- From the screen that now appears, click the Actions dropdown, then Attach to VPC
- In the Available VPCs field, you should be able to select our neo4j-vpc VPC
- Once this is selected, click Attach internet gateway

So, we should now have our VPC, subnets, and internet gateway. Next, we need to create our NAT gateway, so that our EC2 instance in the private subnet can get internet access.
Create the NAT Gateway
- Return to the Amazon VPC console
- In the VPC Dashboard, select NAT Gateways, then Create NAT Gateway
- In the Subnet field, select subnet name: Neo4j Public a
- Your NAT gateway requires an Elastic IP address. If you don’t already have one, click Allocate Elastic IP address
- Click Create a NAT Gateway
- Edit the name of the NAT gateway to be: Neo4j NAT

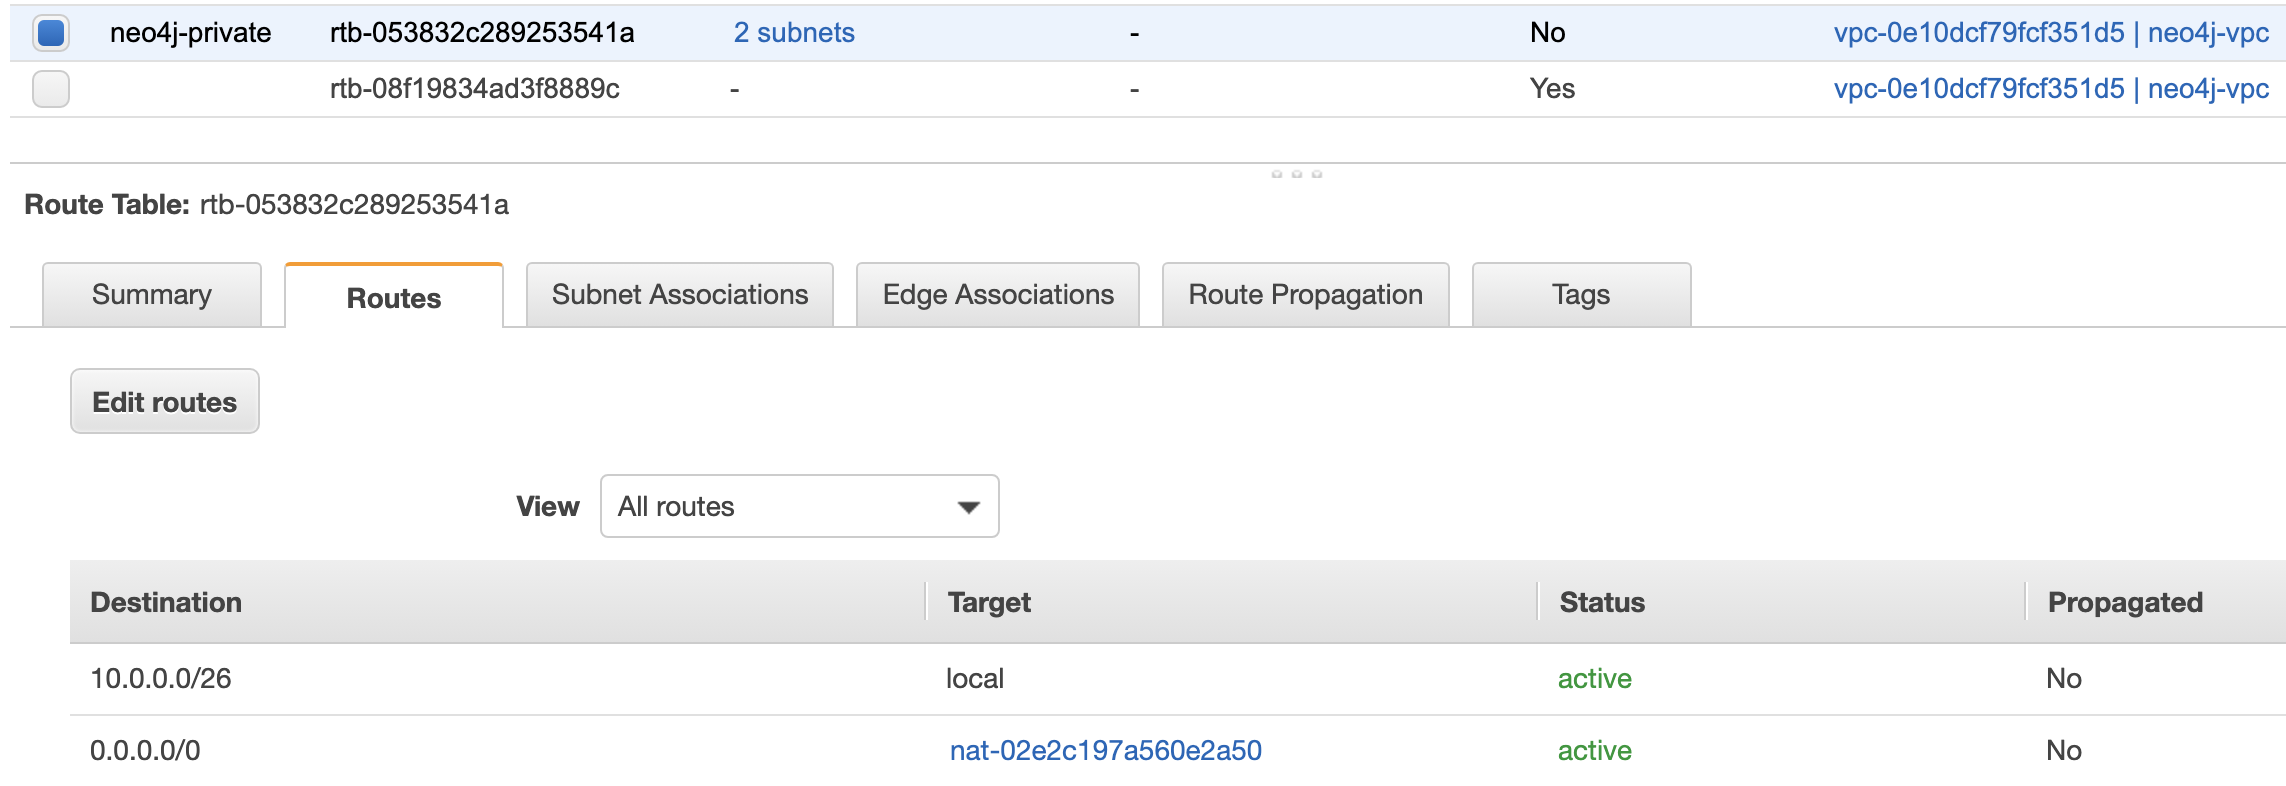
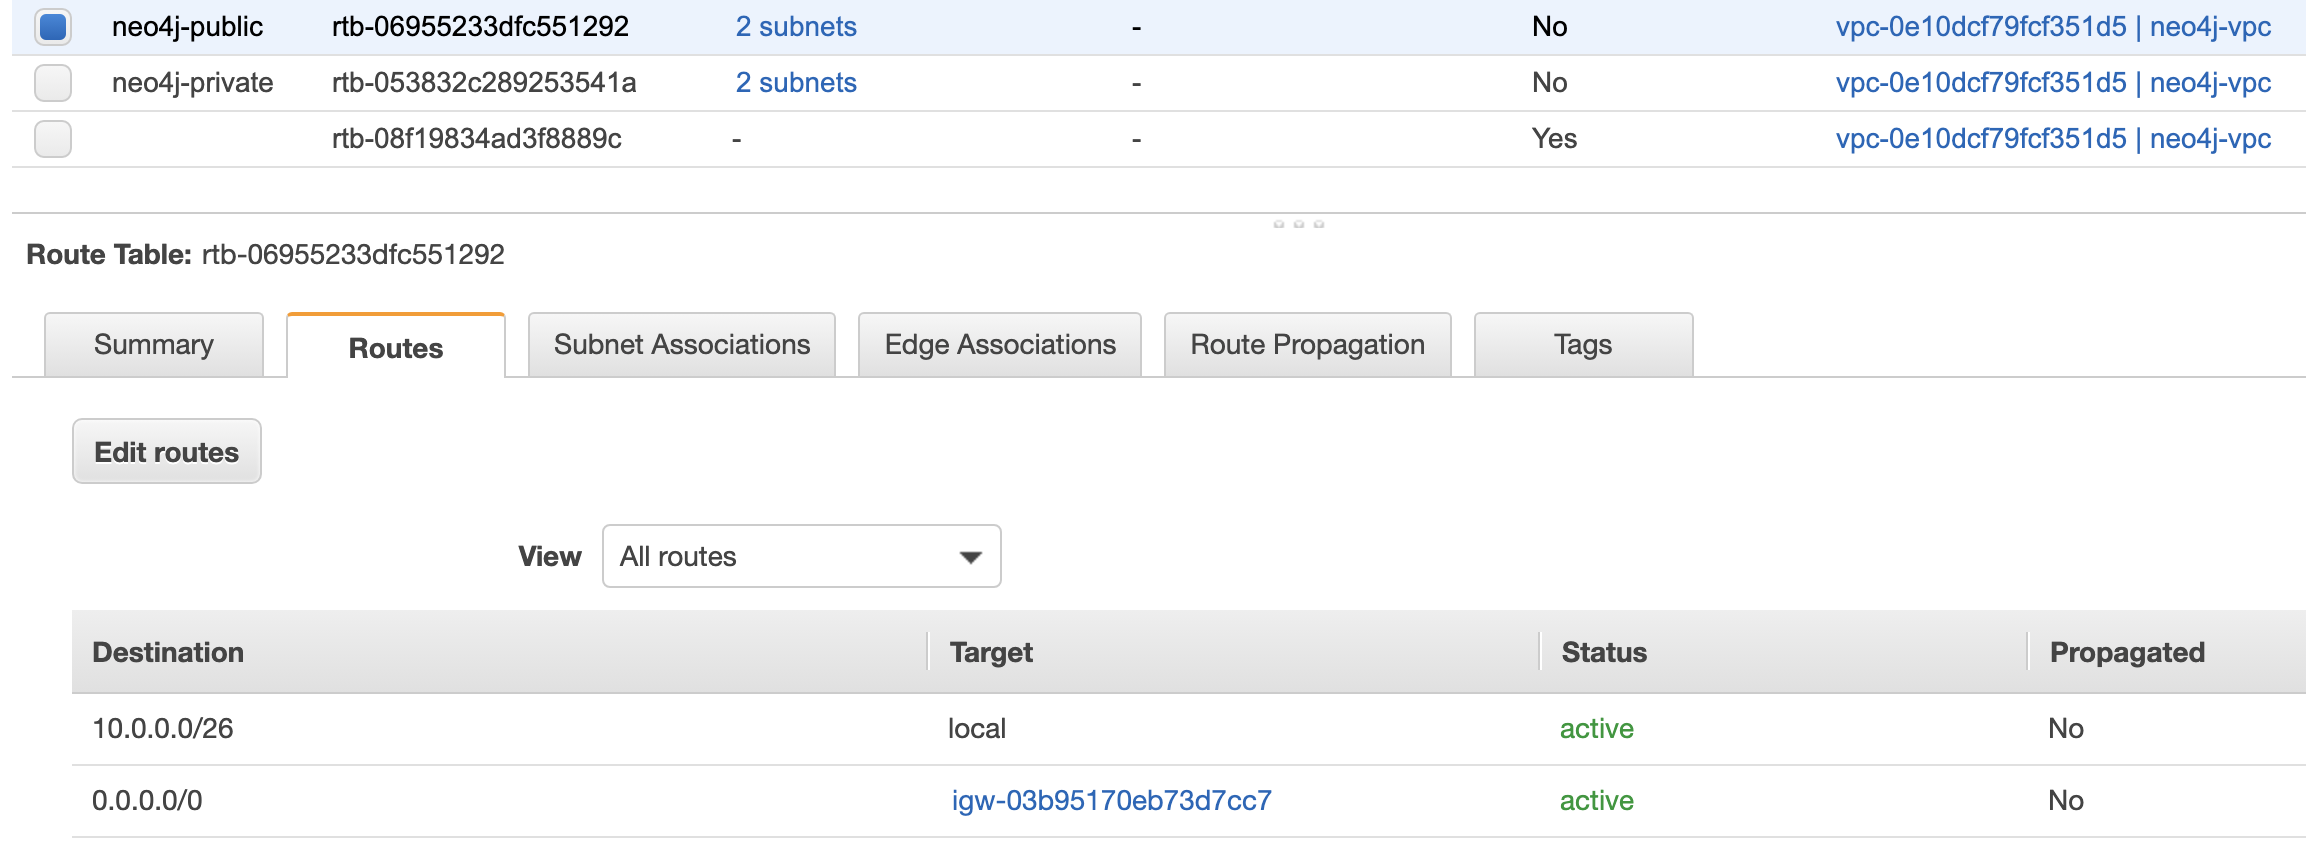
Create the Route Tables
The next step for creating our network is to create the route tables to ensure our public subnets can reach the internet gateway, and the private subnets can reach the NAT gateway.
- Return to the Amazon VPC console
- In the VPC Dashboard, select Route Tables, then Create route table
- Name tag: neo4j-private, VPC: neo4j-vpc
- Select the neo4j-private route table, then click the Routes tab and Edit routes
- Add route, with Destination: 0.0.0.0/0 and Target: Neo4j NAT
- Click Save routes
- From Route Tables screen, click Create route table
- Name tag: neo4j-public, VPC: neo4j-vpc
- Select the neo4j-public route table, then click the Routes tab and Edit routes
- Add route, with Destination: 0.0.0.0/0 and Target: Internet Gateway -> neo4j-igw
- Click Save routes
Create a Bastion Host
The final step in our networking setup is the creation of a bastion host. This is a small EC2 instance in the public subnet that allows SSH access onto the EC2 instances in our private subnet.
- Open the Amazon EC2 console
- Click on Instances, then Launch Instance
- Select an Amazon Linux 2 AMI and set the instance type as t2.micro
- Launch into the Neo4j Public a subnet of our neo4j-vpc VPC
- For the security group rules, just ensure that port 22 is open for SSH traffic
- Launch instance
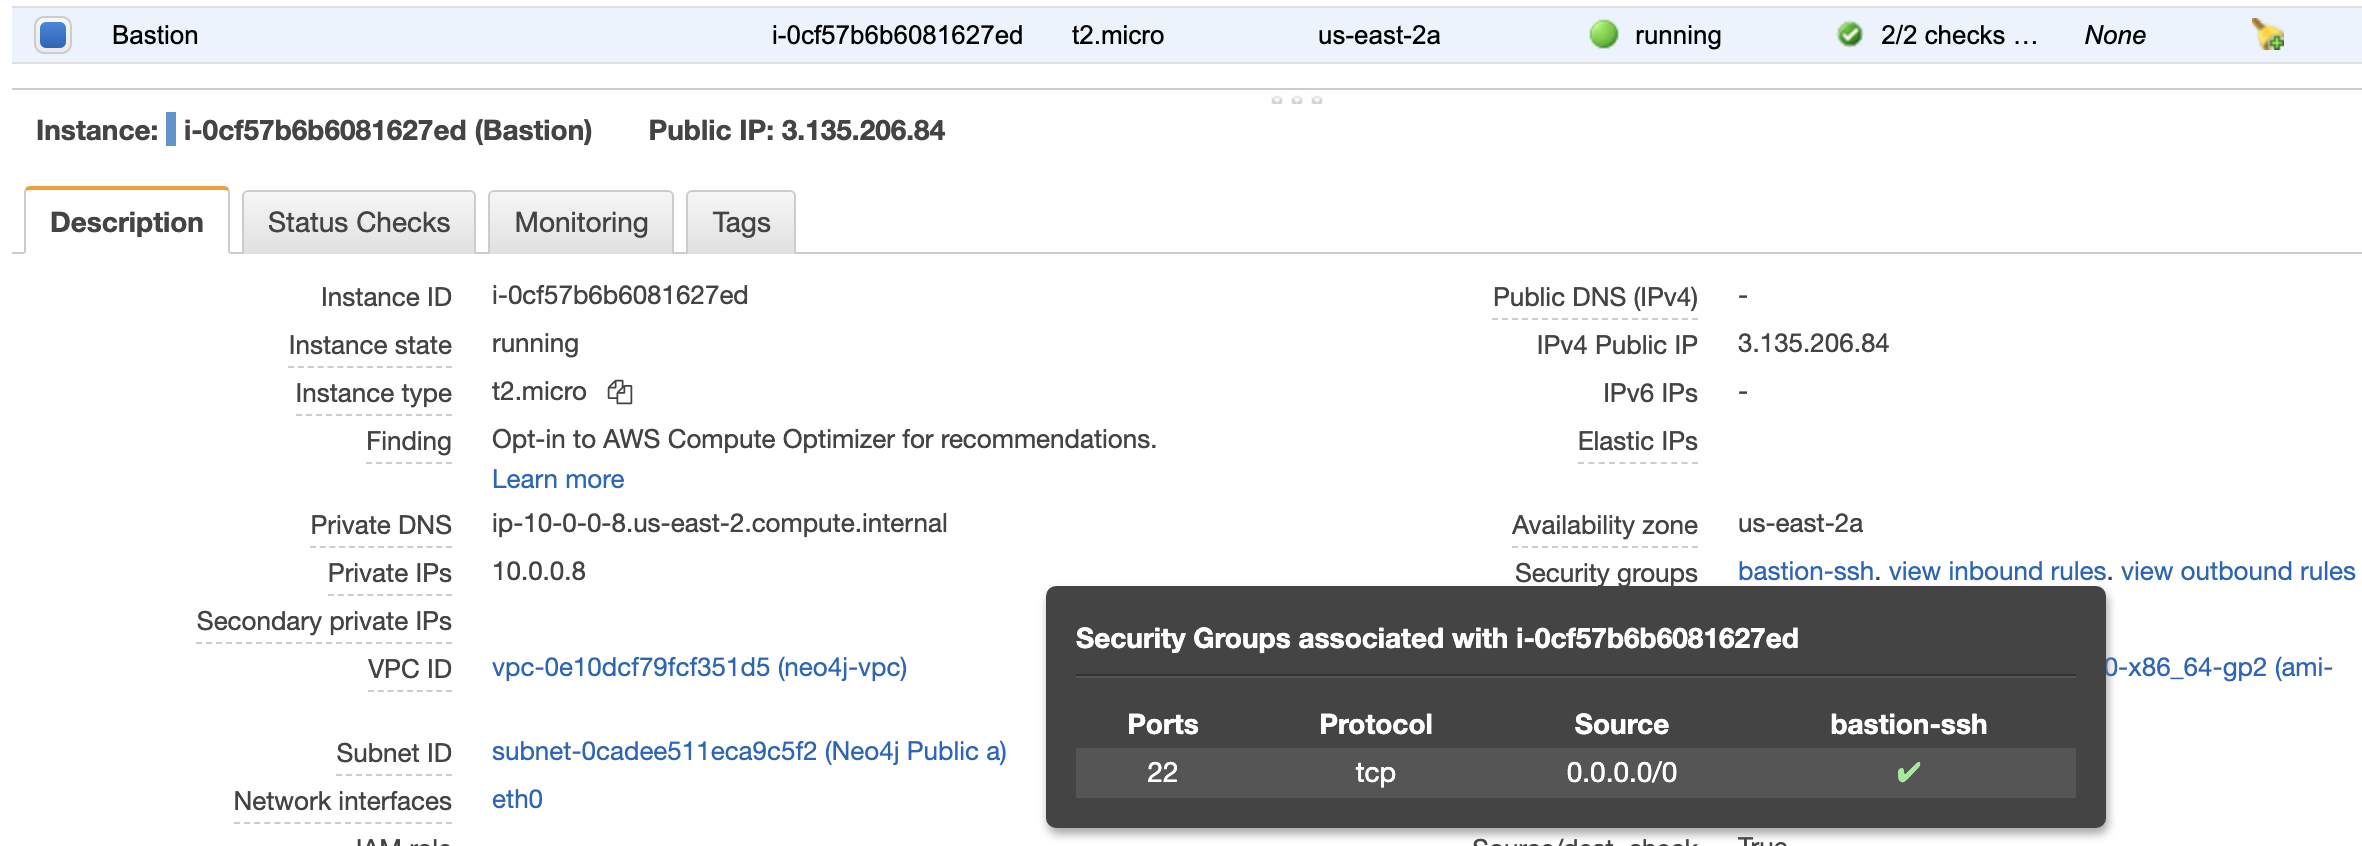
Later in the guide, we’ll show you how you can SSH onto our Neo4j EC2 server in the private subnet via this bastion host.
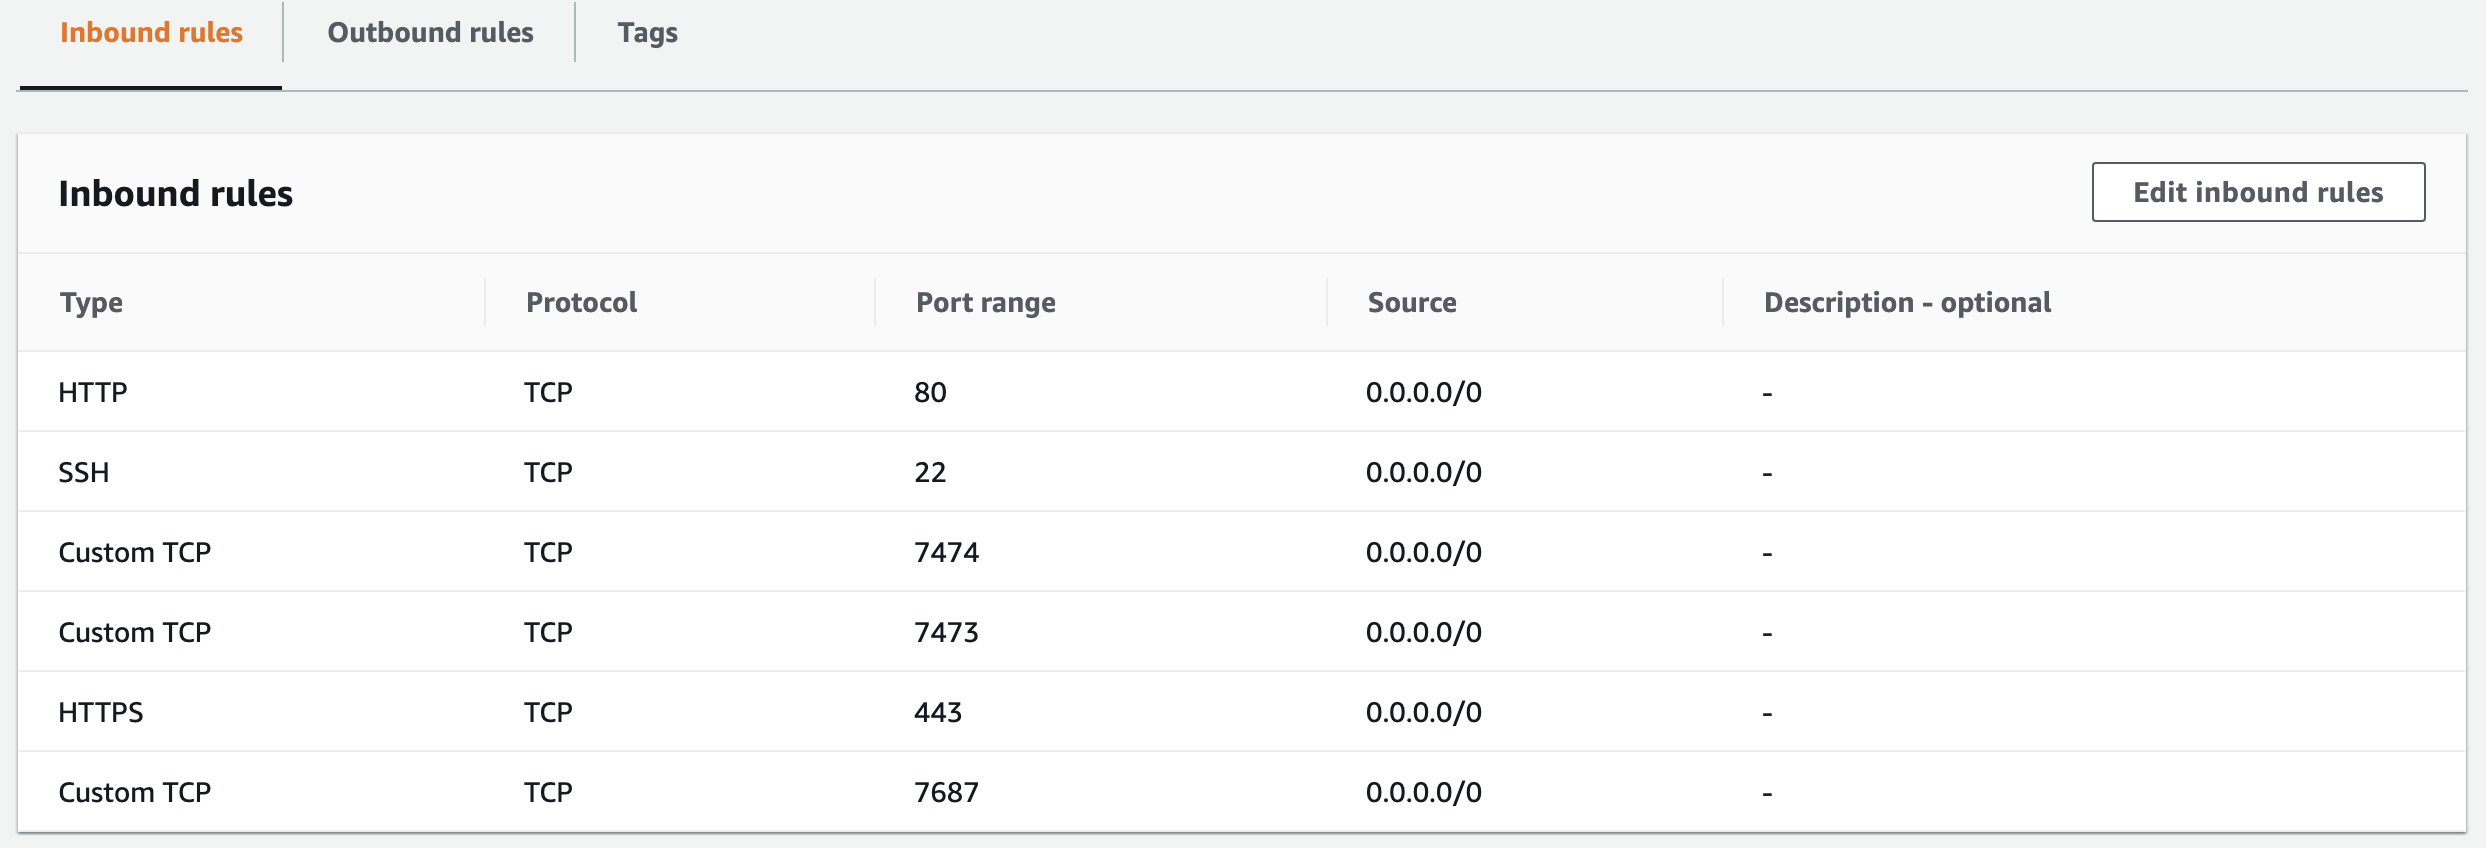
Create the ECS / EC2 Security Group
One of the most important steps in this guide is the creation of the security group for the EC2 instance that will run our Docker container.
Ports 7474, 7473, and 7687 are opened for the Neo4j application, while port 22 is required to allow SSH, and ports 80 and 443 are required for HTTP and HTTPS traffic.
Unless port 443 is open, when the ECS Cluster tries to create the EC2 instance, it won’t be able to communicate with the ECS service, so it won’t appear under the ECS Instances tab of the ECS cluster.
- Open the Amazon EC2 console
- Click on Security Groups, then Create Security Group
- Set Security group name to be: neo4j
- For VPC, select neo4j-vpc
- Edit the inbound rules to allow ports: 22, 80, 443, 7473, 7474, and 7687 on TCP protocol
- Click Create security group
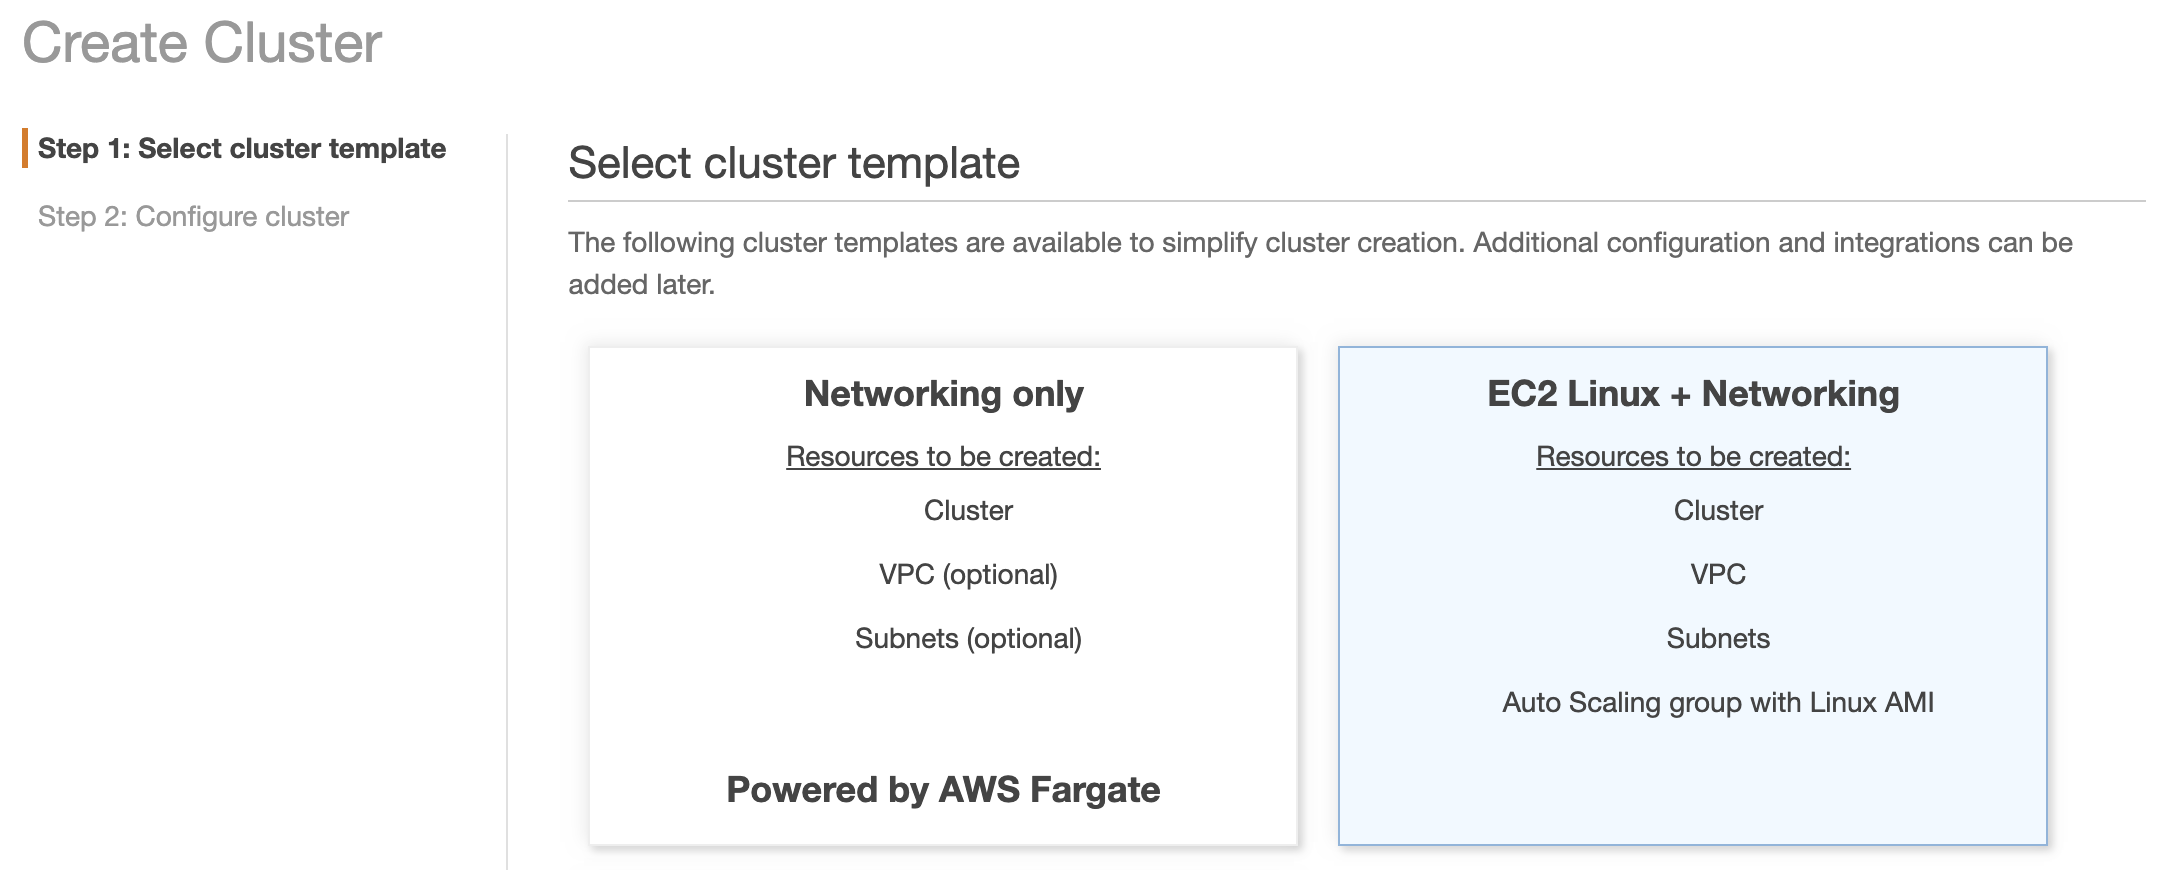
Create the ECS Cluster
- Open the Amazon ECS console
- Click on Clusters, then Create Cluster
- Select EC2 Linux + Networking
- Click Next step
- Provisioning Model can be left as On-Demand Instance
- EC2 instance type was set as m5n.large for this demo
- For Key pair, select an existing one or create a new one. This is so we can SSH into the instance created by the ECS cluster
- Set the VPC as neo4j-vpc
- For Subnets, select the Neo4j Private b subnet
- Set Security group to be our neo4j security group that we just created
- For Container instance IAM role, select ecsInstanceRole. If you don’t have this as an option, you can find steps to create it here
- Click Create
For Cluster name, set the value as: neo4j-ec2
For EC2 Ami Id, select the Amazon Linux 2 AMI. This is an ECS-optimized AMI
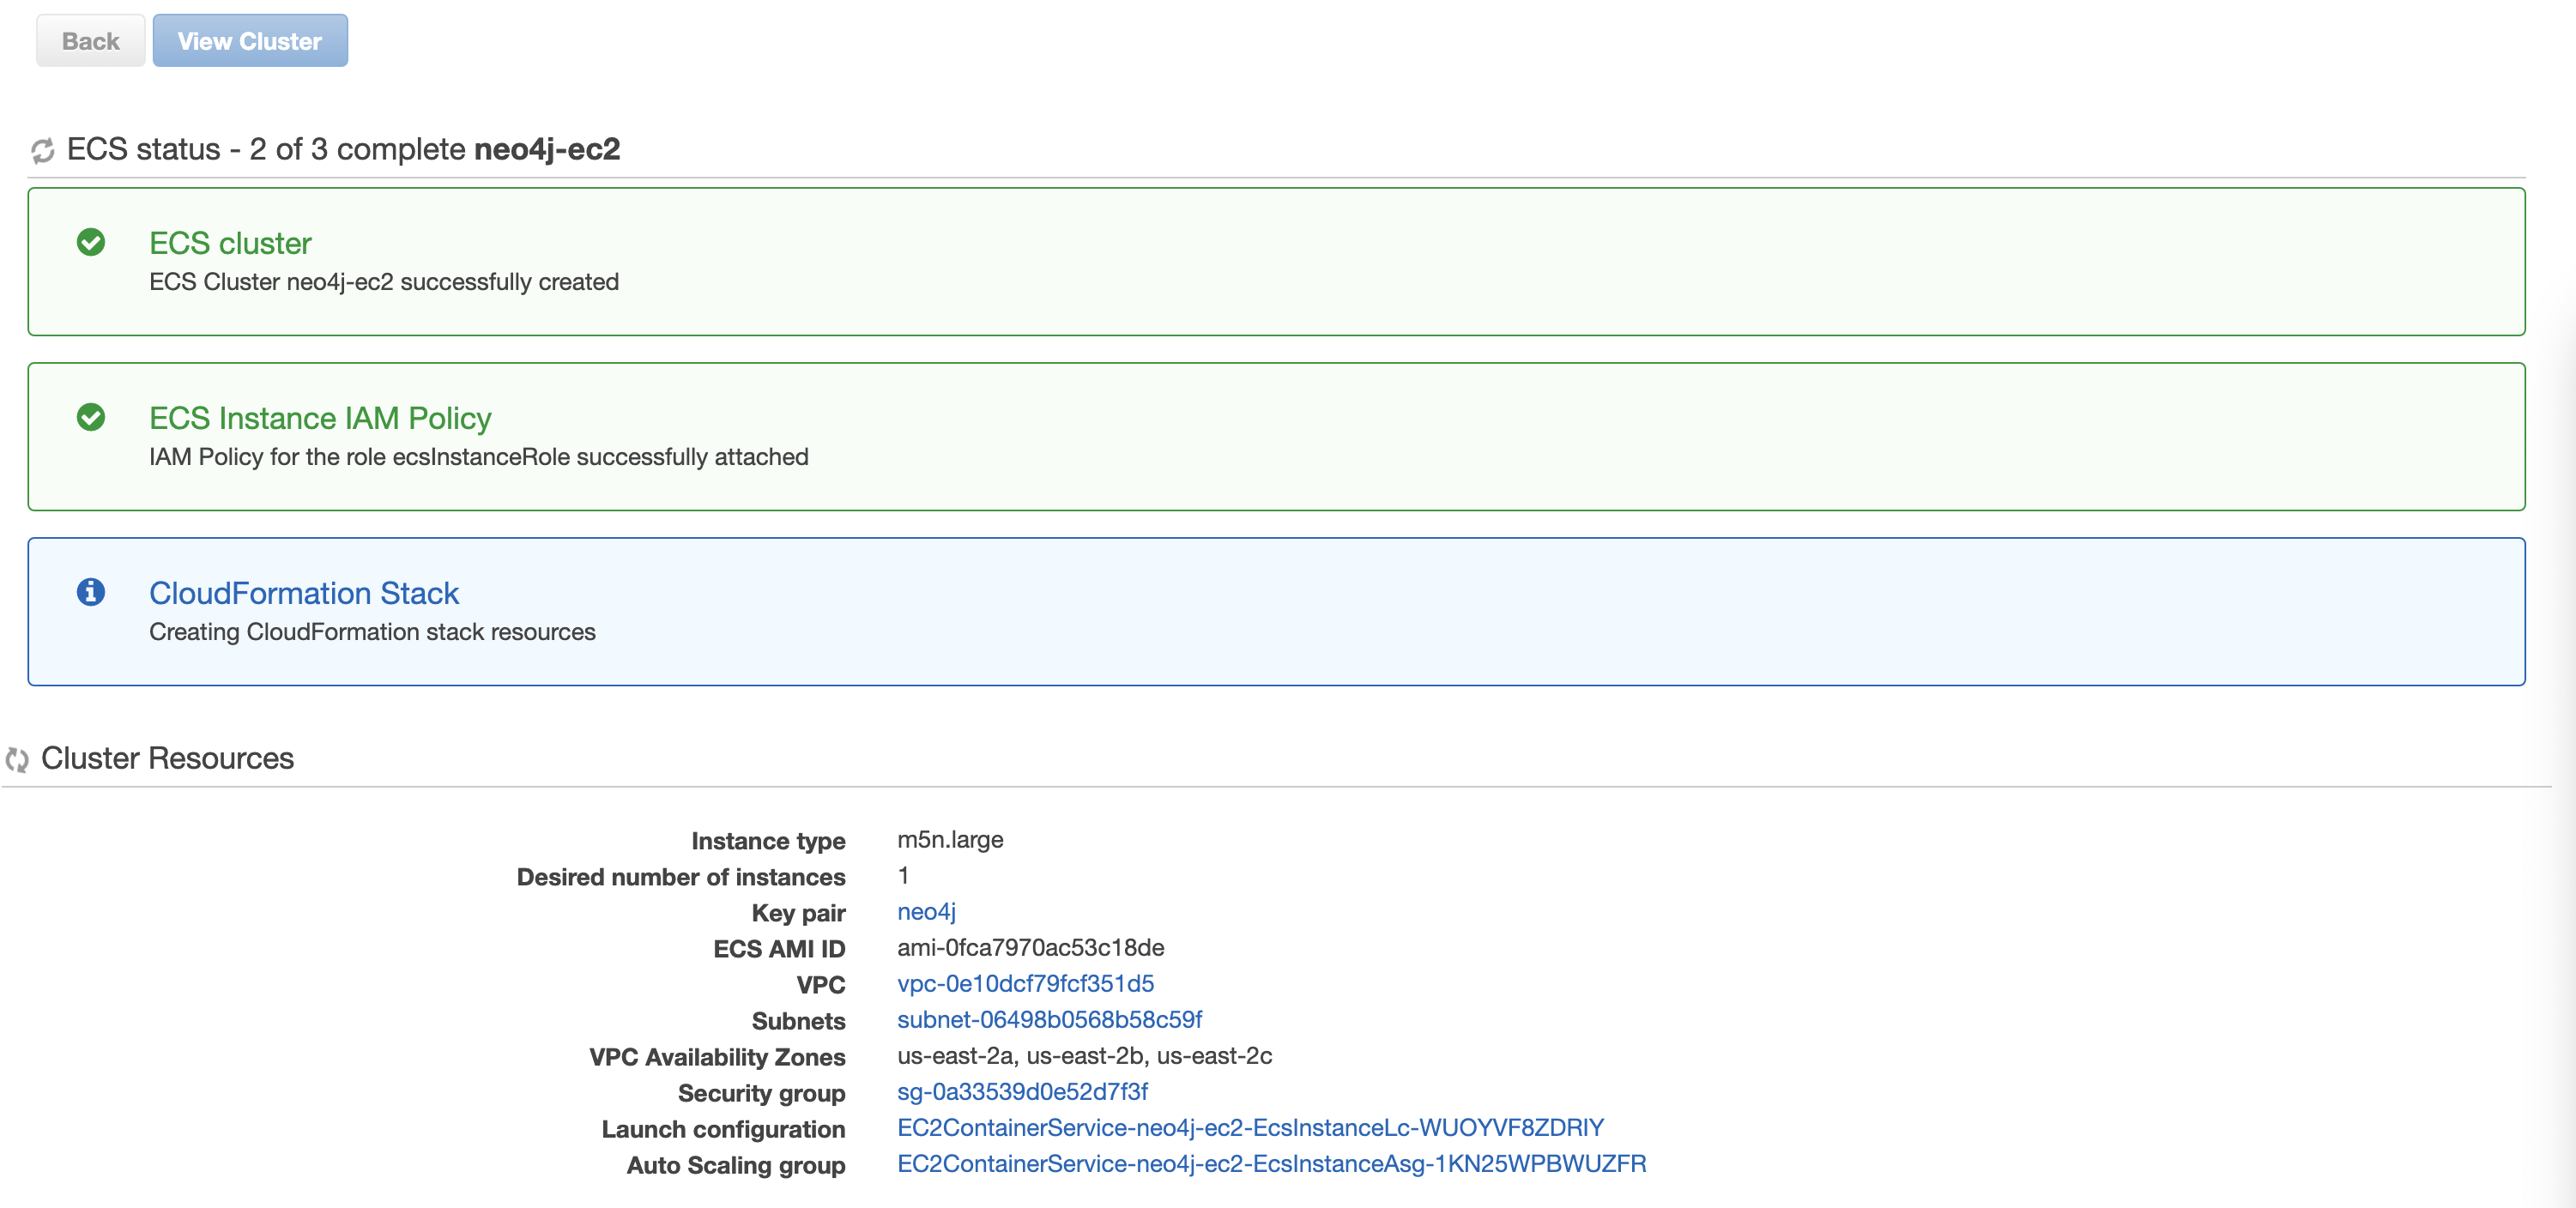
ECS will now perform 3 tasks:
- Create the ECS Cluster
- Attach the ECS Instance IAM Policy for ecsInstanceRole
- Create a CloudFormationStack
The CloudFormation Stack provisions a number of resources, including an Auto Scaling group and Launch Template. You can find the Stack that was created under the CloudFormation console.
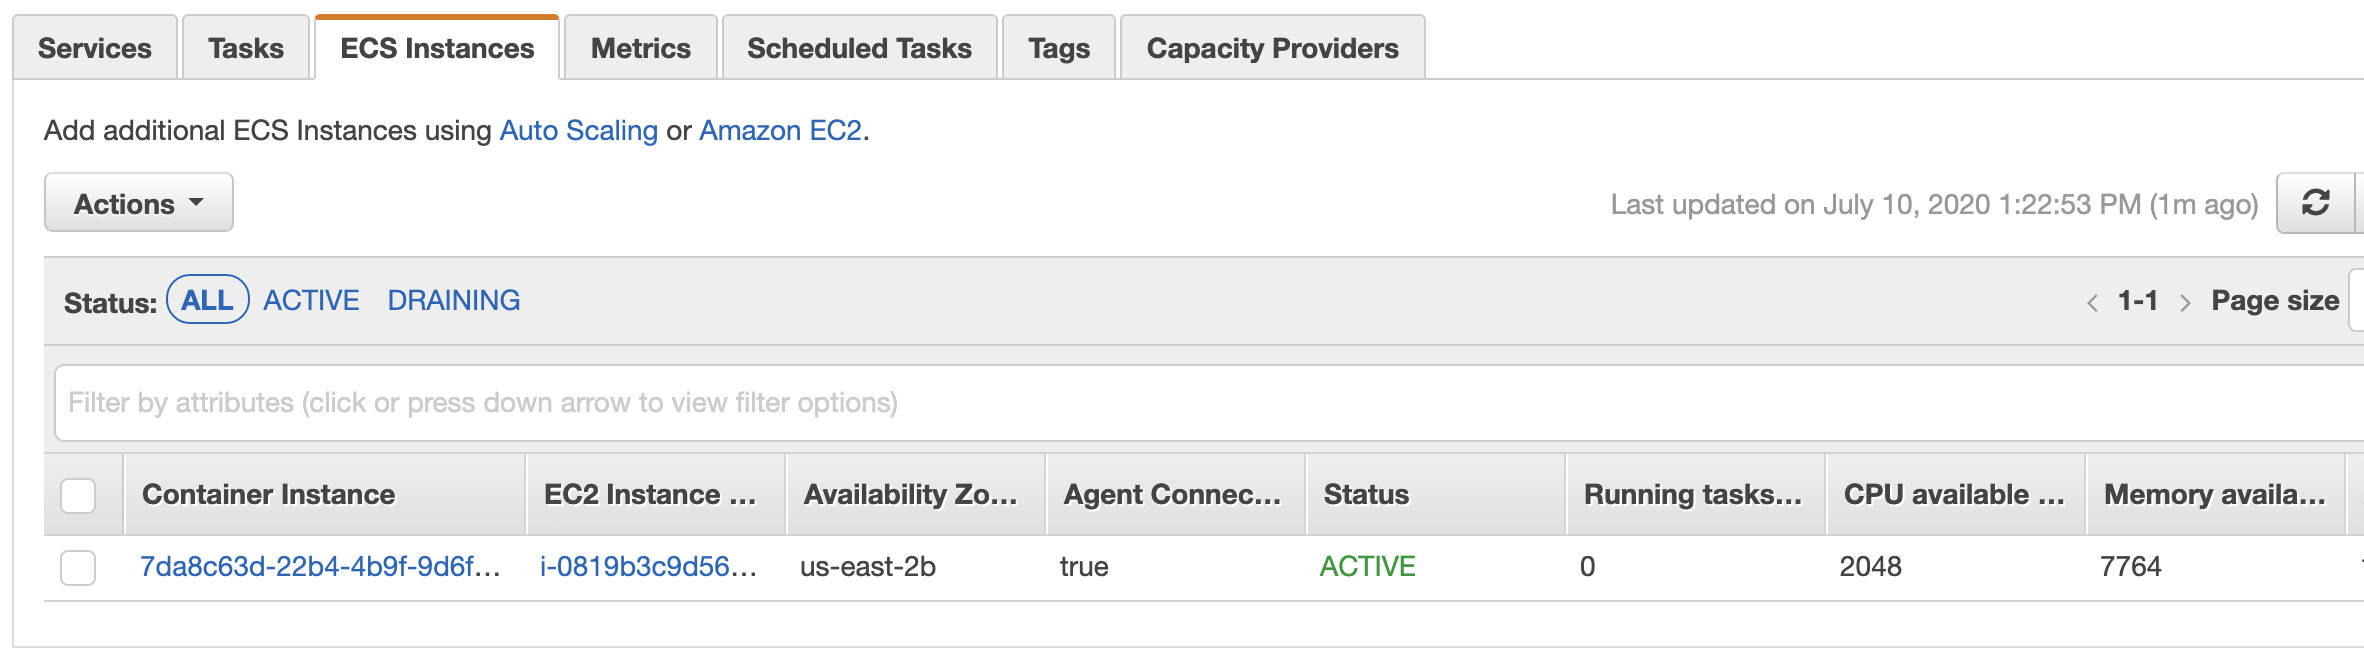
Once all 3 steps are complete, you should be able to see your EC2 instance in the ECS Instances tab of your ECS cluster:
 .
.
Create the ECS Task Definition
By now we’ve created our:
- Network infrastructure
- Two EC2 instances (one bastion and one to run our Docker container)
- Security groups
- ECS cluster
The next step in getting Neo4j running on ECS EC2 is creating an ECS Task Definition. This is where we’ll specify the container to host port mappings, allocate memory and CPU to our container, and specify the Docker image we want to run.
- Open the Amazon ECS console
- Click on Task Definitions, then Create new Task Definition
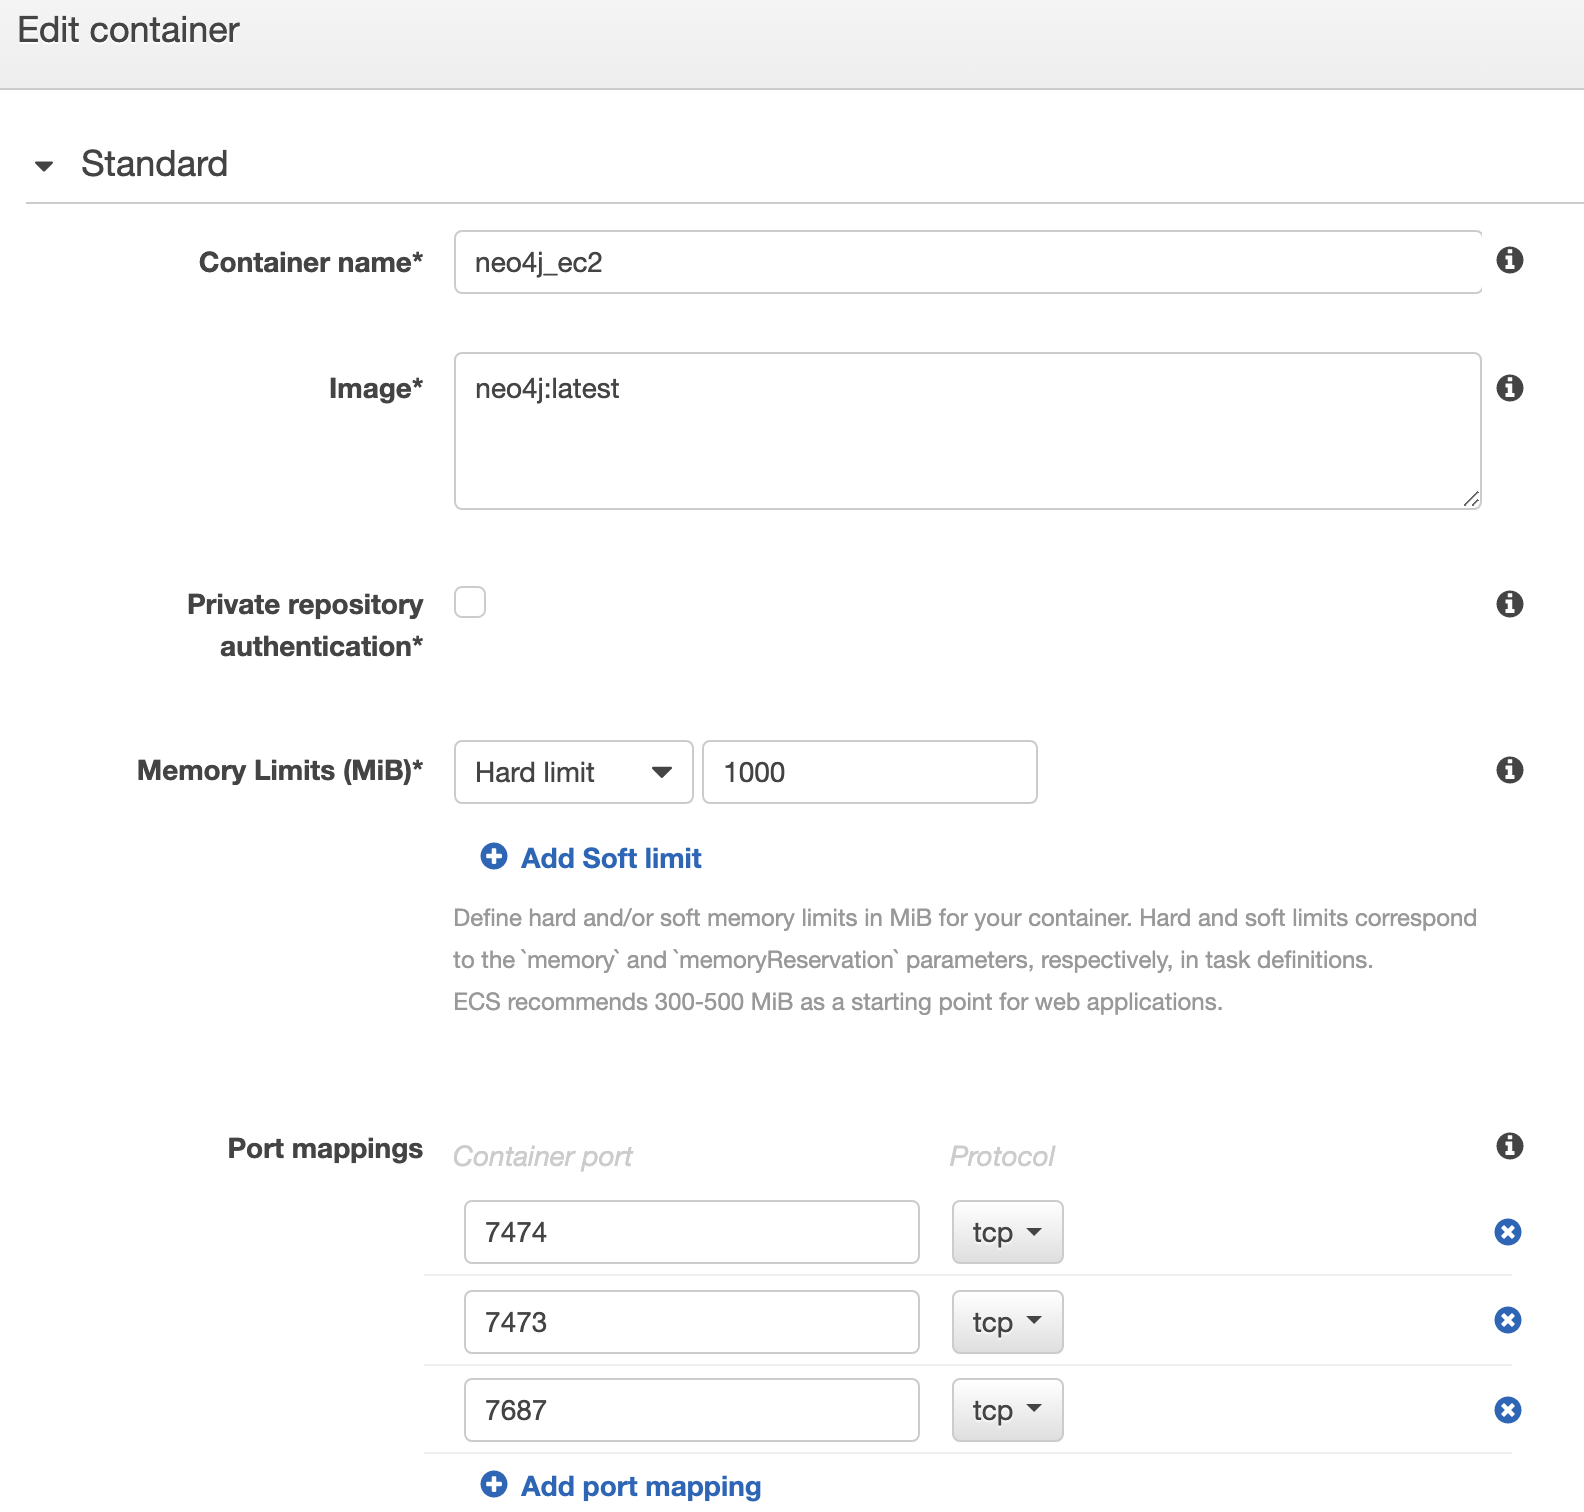
- Set Task Definition Name to be: neo4j_ec2
- Network Mode can be awsvpc
- Task execution IAM role: ecsTaskExecutionRole
- Click on Add container
- Set the Container name to be: neo4j_ec2
- For Image, specify: neo4j:latest. This will retrieve the latest Docker image of Neo4j Community Edition
- Add Port mappings for the following Container ports: 7474, 7473, 7687
- Scroll down to Environment variables, and set the Key to be NEO4J_AUTH, with a Value of neo4j/
. can be whatever you want your password to be. This bypasses the default setting of having to reset the password when you first use the Neo4j database. The full list of Neo4j Docker environment variables can be found here. - Scroll down to Log configuration, and select the Auto-configure CloudWatch Logs checkbox
- Click Add
- At the main Task Definition creation window, click Create
You now have an ECS Task Definition that can be run on the EC2 container instances in your ECS cluster.
Running the Neo4j ECS Task
The final step of getting Neo4j setup in a Docker container running on an EC2 machine in a private subnet is to run the task.
This can be achieved by either creating an ECS Service, or simply running an ECS Task. For this guide, we’ll just perform Run Task.
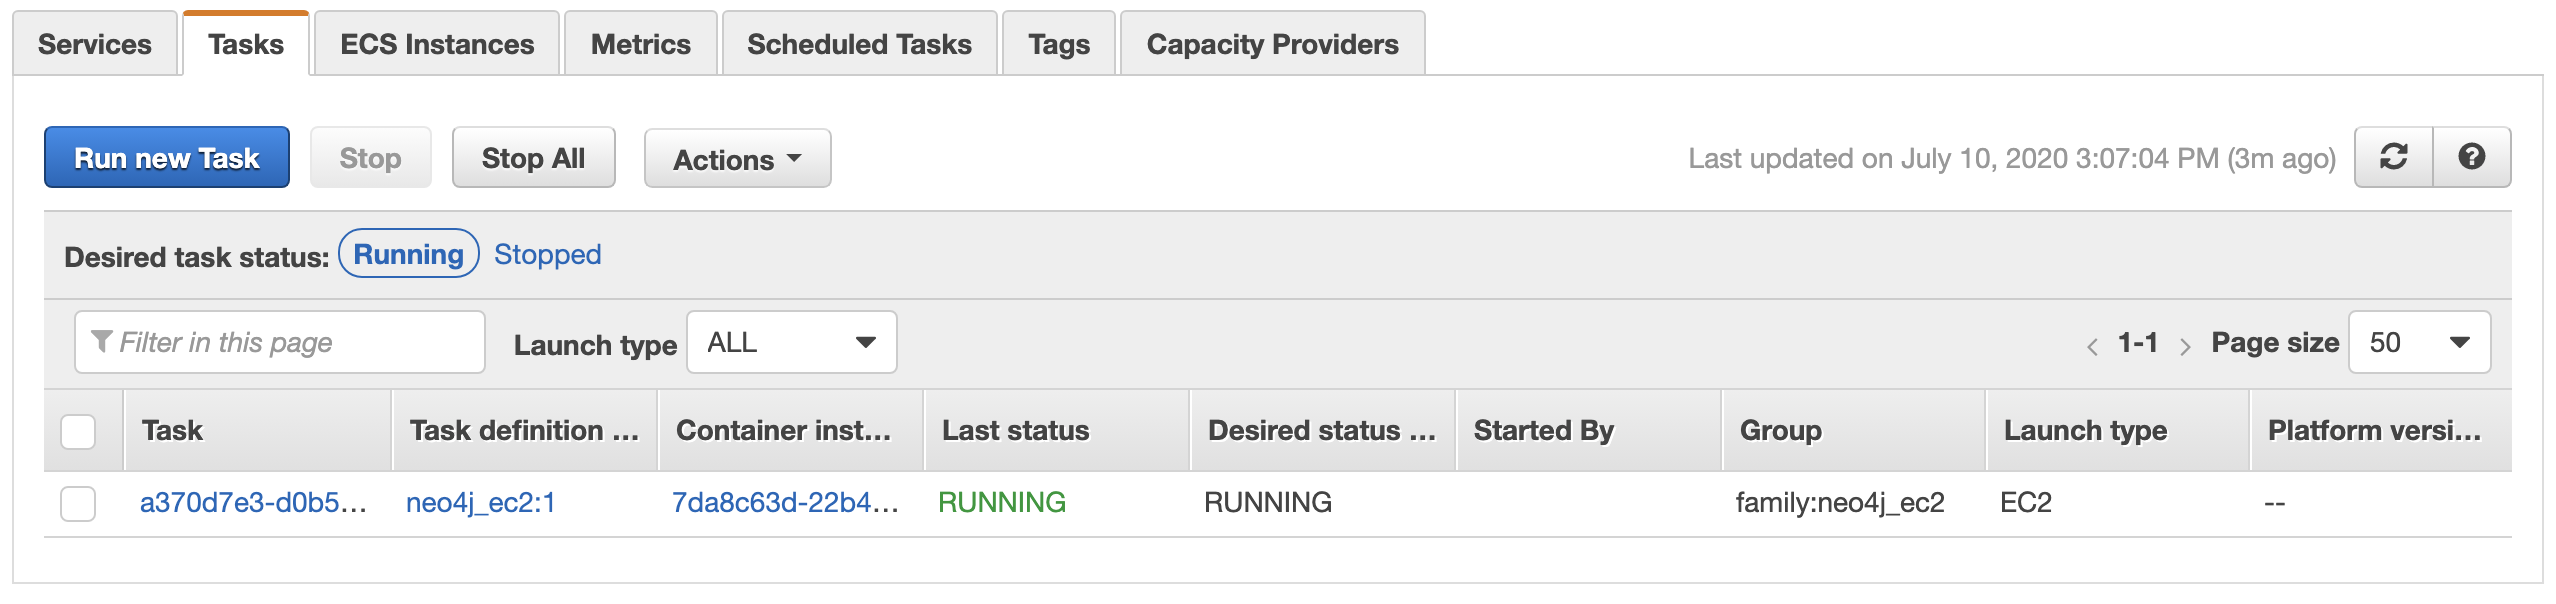
- Open the Amazon ECS console
- Open the neo4j-ec2 cluster we created earlier
- Click the Tasks tab, then Run new Task
- Set Launch type as EC2
- Set Task Definition Family to be neo4j_ec2
- For Cluster VPC, select our neo4j-vpc VPC
- For Subnets, select Neo4j Private b. This must be the same subnet that you launched the EC2 instance into when creating the cluster.
- For Security groups, click Edit then Select existing security group, and choose the neo4j security group
- Click Run Task
You should now be returned to the page for your ECS cluster, where the Tasks tab will show one new task with a Last status of PROVISIONING.
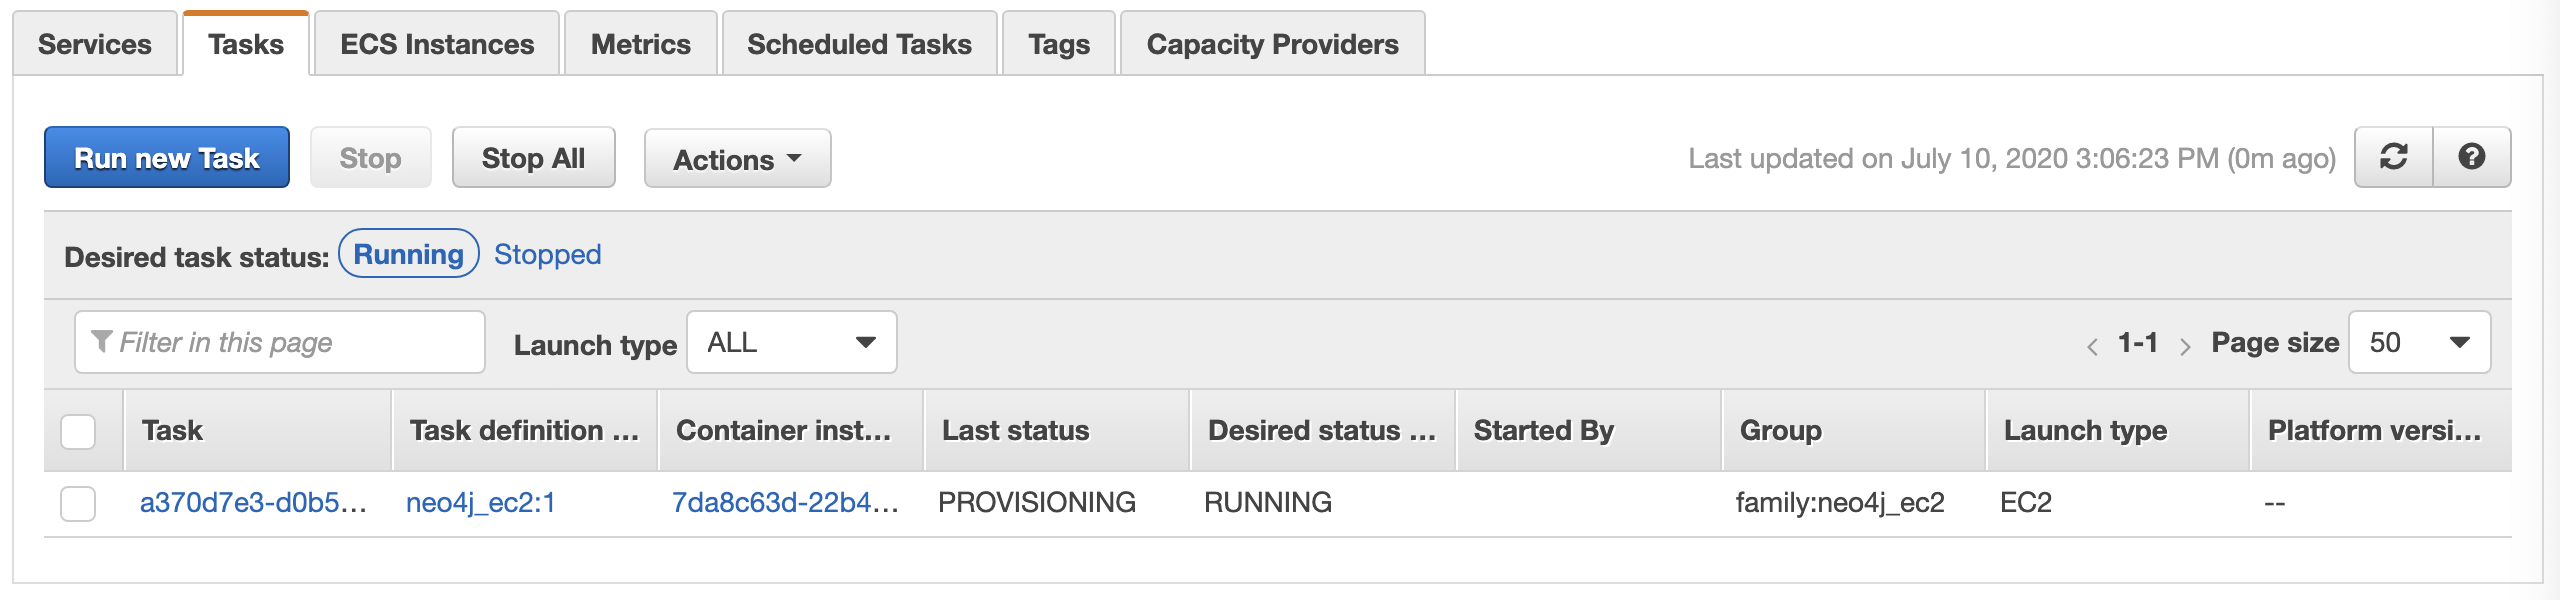
This should soon progress to RUNNING status.
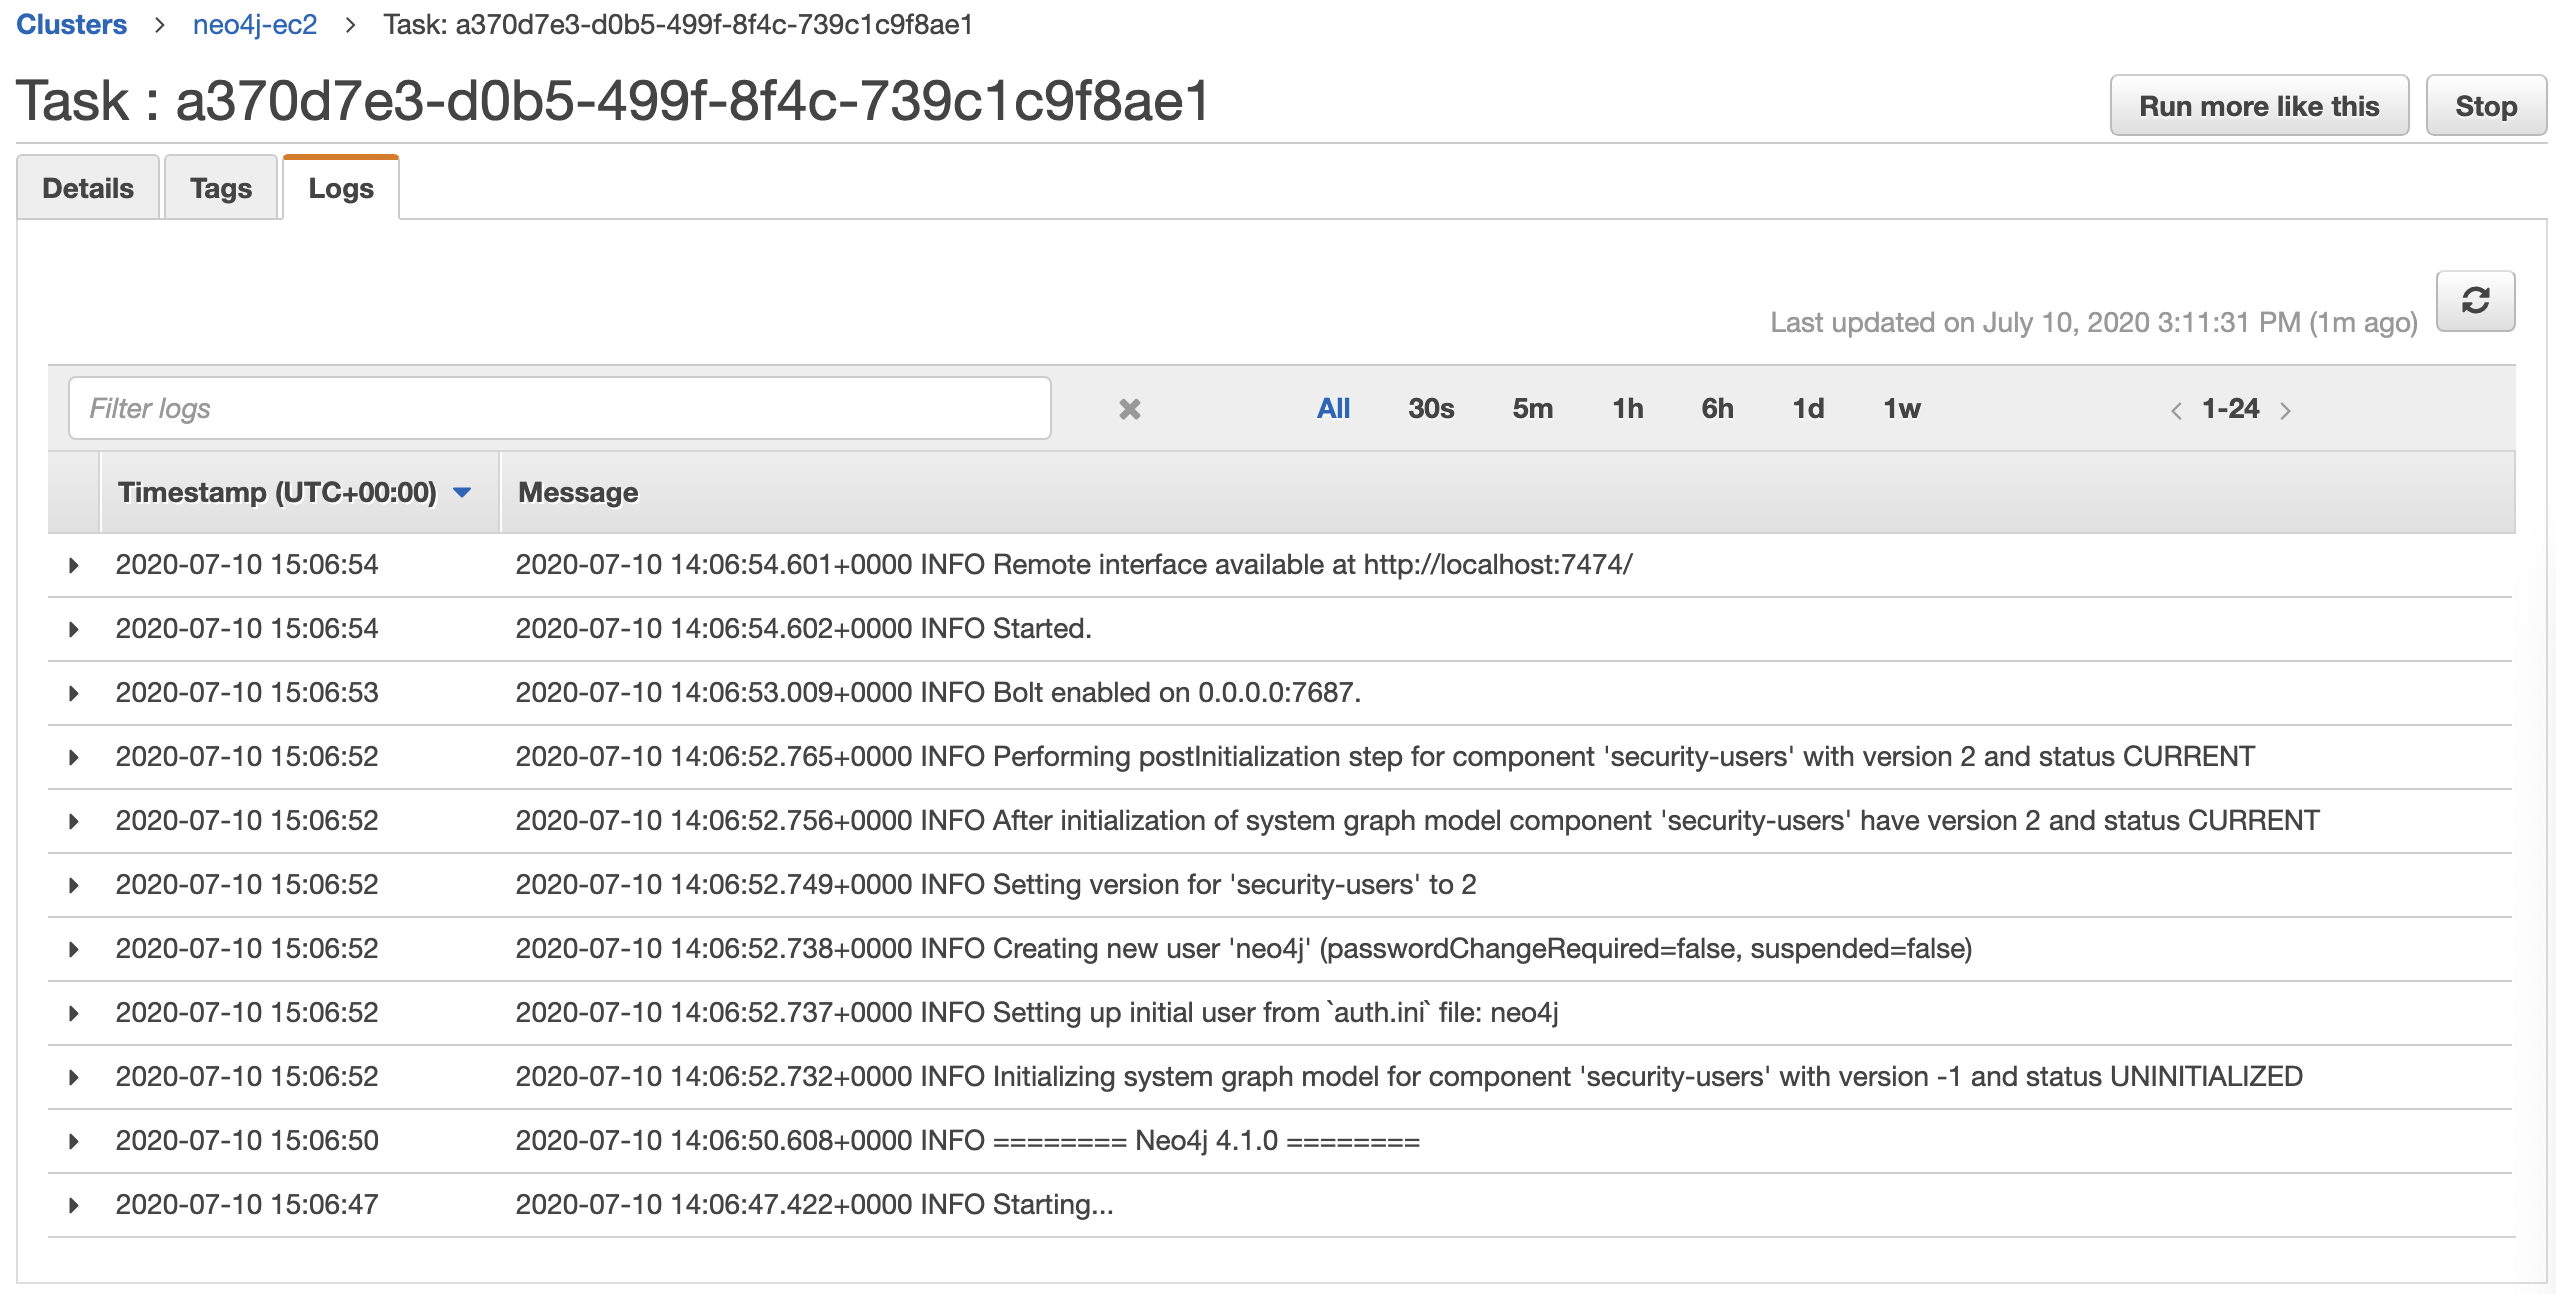
From the Tasks tab, if you click on the ID of the task you just ran, then click the Logs tab, you should see that Neo4j has been started successfully.
So, now that we have Neo4j running in a Docker container on an EC2 instance in our private subnet, what’s next?
There are two final steps to this guide:
- SSH into the Docker container and check the Neo4j logs
- Connect a Lambda function to Neo4j and write a Cypher query to create a node
SSH into the Neo4j Docker Container
For this you’ll need a few pieces of information:
- EC2 Key Pair file you chose when creating the ECS cluster
- EC2 Key Pair file you chose when creating the EC2 bastion instance
- IPv4 Public IP of the EC2 bastion instance
- Private IP of the ECS-optimized EC2 instance
We follow similar steps to the one in this AWS guide.
Open a new Terminal window if on Mac, or CMD if Windows, then run the following commands (substitute your own values in as required):
ssh-add -K KEY_PAIR.pemssh -A ec2-user@BASTION_PUBLIC_IPssh ec2-user@ECS_EC2_PRIVATE_IP
Note: When you look at the Private IPs for your ECS EC2 instance, you’ll see two IP addresses. One is for the ECS Task that’s running on it, and one is for the EC2 instance itself. You’ll want to SSH using the one for the EC2 instance, not the one that belongs to the ECS Task.
You should now be on your ECS-optimized EC2 instance. You can confirm the Neo4j Docker container and ECS agent are both active by running: docker ps.
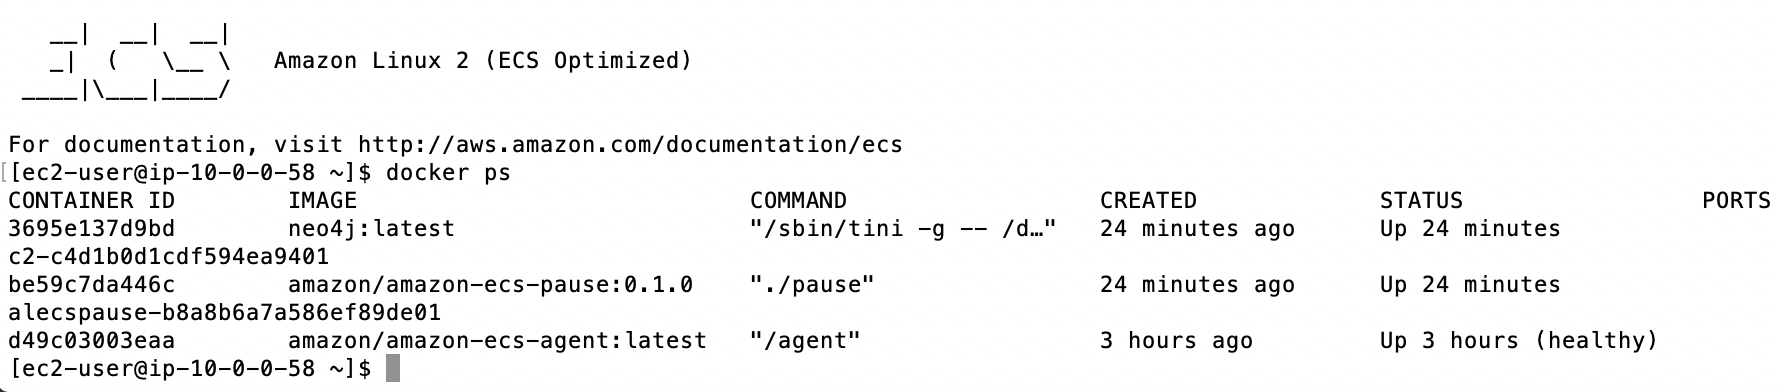
If necessary, we could then SSH into the container itself by running docker exec -it [container id] bash.

This allows you to look through all of the Neo4j files in the container, including debug logs.
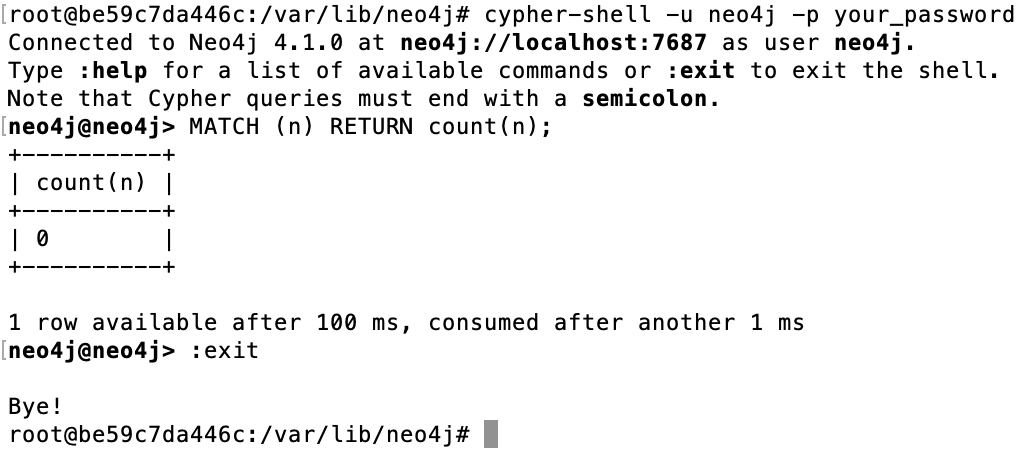
Following the official Neo4j Docker documentation, it is at this stage that you can also access the Cypher Shell tool.
Run the following command to access the shell:
cypher-shell -u neo4j -p YOUR_PASSWORD
If you now run a Cypher query, such as MATCH (n) RETURN count(n);, you should have the result displayed in the window.
Create a Lambda to Query Neo4j
The Lambda code for this can be found in our earlier article, How to Setup Neo4j on AWS EC2. You just have to make sure that when you specify the bolt address for the uri to connect to Neo4j, you use the IP of your ECS Task.
For example, if your ECS Task IP is 10.0.0.56, set the uri to be: bolt://10.0.0.56:7687.
If you try to use the IP of your private EC2 instance, Neo4j will throw an error saying that it Failed to establish connection to IPv4Address.